How to use marker floats - top tips and techniques
Marker floats are often misunderstood. Colin Davidson explains how to get the most out of them.
Welcome to Advnture, the new home of AnglersMail.co.uk
Marker floats help us understand and interpret the nature of lakes beneath the surface, and can help us locate areas that are significant in fish behaviour, whether they be bars, deep holes, troughs or thick silt beds.
A marker rod is a tool to help us understand the habitat a carp lives in. At times it is absolutely essential but it’s also possibly the most mis-used and over-used item in a modern carper’s armory.
Markers have their place in carp fishing, but too many look at chucking leads and floats around as an essential process, a box that many feel they need to tick before starting to fish. Utter rubbish!
I’d guess there are as many venues as not where plumbing and feature finding aren’t a great use of your time, and your eyes will tell you as much if not more than a marker float.
Probably because of the short periods of time I spend on the bank and the nature of many of the waters I fish, I rarely use a marker rod. Instead, I prefer to look for signs of fish and respond to them rather than measuring depths and casting repeatedly.
But there are many venues where the nature of the underwater environment is complex, notably gravel pits, and the understanding that feature finding offers helps us enormously.
Advnture Newsletter
All the latest inspiration, tips and guides to help you plan your next Advnture!
Much of modern carp angling revolves around session fishing, so it’s understandable that no-one wants to waste long periods fishing on guesswork and then finding hook baits have been in the deepest siltiest hole on the pond. Certainly not when all the carp are sunning themselves on a shallow bar in three feet of water that they were oblivious to.
Marker work helps add jigsaw pieces to the puzzle that we need to solve to catch carp. But a bit like the old road safety adverts, stop, look, listen and think before you start slapping markers around in your swim.
On the plus side, with quiet banks, weedbeds thinned out and died off and sport largely miserable, now is a great time to spend an afternoon or two popping a float up on your favourite lakes to give you some more jigsaw pieces for when carp liven up this spring.
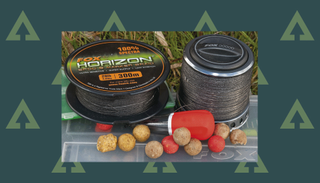
1 – Braided main lines make marker work and feature finding easier than ever before. Their lack of stretch transmits every knock and bang from the lake bed back through the line to the rod and reel.
Compared with mono, which has significant stretch, it’s like trying to touch leger with or without mittens on. Braid is more expensive than mono but lasts for several seasons if looked after and is an absolute must on a marker outfit.
Look for braids of 15-20 lb on 200 m or larger spools. Many companies sell purpose designed marker braids.
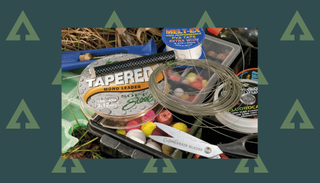
2 – A mono leader is wise even for shorter ranges. Smoother than braid it slides through a run ring easily to allow floats to pop up readily. Tapered leaders produce a finer knot with the braid main line.
I tie a 30 ft leader (four and a half arm spans) using a double five-turn grinner. Tapered leaders are designed for distance work and are unnecessarily strong at the fat end, so tie the finest end to the braid and snip 30 ft up, leaving you with typically 20-25 lb at the lead end – more than sufficient.
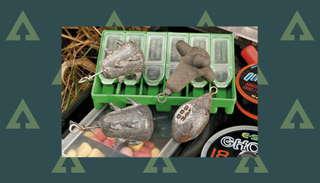
3 – You can locate features readily with standard dumpy pear style leads but specialised designs are better, having prongs or rounded lobes to improve contact with the lake bed and improve feel.
Leads that have prongs are excellent, and several manufacturers now make these. They also serve to collect any debris like decomposing leaf matter that also gives you vital clues to preferred feeding areas. Feature finding leads don’t need a plastic coating, bare lead on stone is preferable.
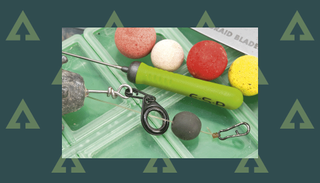
4 – For most venues a simple marker set-up is more than adequate. Thread a large bore ceramic lined run ring up the line, followed by a large diameter rubber bead. Then tie a speed link on the end of the leader.
Leads can be clipped on to the run ring using another speed link, allowing leads to be changed depending upon the swim, venue and range being investigated. It also allows leads and floats to be removed when the rod is not in use which protects the blank and float from damage.

5 – For the majority of the time micro style markers are all you need to feature find effectively even up to 80 to 90 yards. The best ones have tough injection moulded plastic with high viz tops that can be seen easily.
For darker water conditions yellow is best, followed by the traditional orange floats, but you are foolish not to have at least one black topped float in your bag. In more open swims where there is a lot of reflected light on the water black is unmissable.
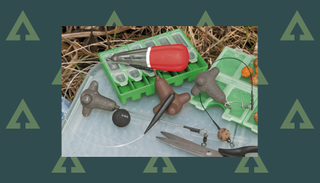
6 – Weedy or very silty waters demand a slightly tweaked marker set-up. Because weed and detritus can easily clog a run ring and make floats troublesome to pop up it’s best to fish the lead on a wire or stiff mono boom that keeps the run ring and main line up away from the lake bed.
These plumbing links are also readily available, either coming in marker kits or sold separately. You can also easily make your own with 8-10 in. of stiff rig material. They need a quick change clip at one end for the lead, tied to the run ring at the other.
Some marker leads are also available on elongated wire stems which is an easy solution.
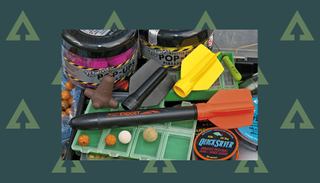
7 – Aside from weed and silt, plumbing accurately at long range also demands revised kit. The best long range floats are narrow pencil style with a vaned top for accurate flight and improved visibility.
Many also feature interchangeable tops to cope with different lighting conditions without breaking down the end tackle.
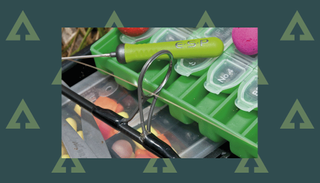
8 – The majority of anglers don’t and won’t spend on a dedicated marker rod, preferring to use a spare fishing rod.
Marker rods tend to feature depth markers in front of the reel seat, a powerful casting action and responsive tip, and models with slimline lined rings noticeably improve feel. But the reality is that with braided line and the correct float set-up you’ll feel pretty well the same with a fishing rod.
They need to be beefy though, markers and leads taking much more of a whack to get any distance than baited rigs. A 12 ft 3 lb test rod is ideal.
9 – A free-spool facility on a reel is worth its weight in gold when feature finding because we spend so long feeding line from the spool to chart depths.
You can do it by slackening a standard clutch but it’s time consuming and incredibly irritating.
Large spool reels are an advantage simply because they reduce retrieve time between casts, but because braid casts so well you can achieve long distances even with small free-spool reels.
10 – In a swim you need to be accurate and methodical in your casting to search out underwater features.
Start at either the left or right hand side of a swim and cast out. Before the lead and float hit the water, feather the line and trap it on the spool so the float sinks on a tight line to keep it and the lead together.
Keep the rod tip high and as the lead hits bottom and you’ll feel one of several sensations, either a sharp bang from the lead hitting gravel, a soft release of tension from silt or weed or a rounded thump from clay or sand.
11 – Once the lead has touched down it’s vital to straighten the line from rod tip to lead before trying to measure depth.
Keep the rod tip low and gently draw the line back until it is pointing where the lead landed. At range or in windy conditions it can take a while but ensures you remain accurate rather than feeding slack into a huge belly in the line.
If you are a newcomer to braid go gently, you can accidentally dislodge the lead very easily.
12 – If you’ve straightened the line the float will be pulled back down to the lead.
Keep the rod tip close to the water and in the same position then engage the free-spool and feed line from the reel a foot at a time. You should be able to keep your eyes on the water where the lead landed whilst doing it.
Count the line you feed from the reel until the float pops to the surface. Pause for a second or two after each foot of line is released, depending upon the range and conditions there’s a small delay before the float rises.
13 – Keep a mental note of the depth you record, then slowly sweep the rod back to pull the float back down to the lead. You should feel it lock up.
Keeping the rod low draw the tip back steadily six feet. Then retrieve a couple of turns to put the rod back in the start position without moving the lead further.
Now feed the float up and chart the depth again. Once you find major differences in depth make a mental note of where the float is and you can cast to either side in the same area to get a mental picture of the feature you’ve found, whether a bar parallel to your bank or a smaller hump.

14 – The nature of the bottom is revealed by the sensation through the line and on the rod tip as you draw the rod back inbetween popping up the float.
Gravel is unmistakable, you’ll feel sharp tapping and banging as the lead pulls across stones.
Silt will see the rod tip lock up initially as you try and move it and then come free, the lead feeling heavier and dampened in its movement.
Sand and clay are smoother, like pulling across glass.
If you land in weed the lead will lock up and then feel like pulling a wet blanket in as it catches around the lead.
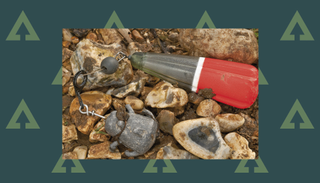
15 – Depths are only a small part of the subsurface puzzle, and what you retrieve around the lead and even how it smells all give vital clues as to the likelihood of carp being prepared to feed in an area you have located.
Avoid areas that see the lead come back black, smelling foul or with rotting leaves and vegetation around the prongs.
Nice green, fresh smelling weed is a good bet for a productive area, or any areas of silt with bloodworm around the lead and link.
Running from 1964 until 2020, Angler's Mail was the UK's leading weekly magazine devoted to coarse fishing, telling readers everything they needed to know about which fish to catch, where to catch them, and what kit they needed to do it. Now, loads of the magazine's expert advice can be found on Advnture.com, as a helpful resource for angling newcomers and experts alike.
Most Popular

