
Solid knowledge of rock climbing knots becomes essential once you graduate from the climbing gym to the crags and cliffs of the great outdoors. Those that have already practised roped climbing at the gym will already have a good grasp of how to tie into a harness, but once you start to eye up multi-pitch routes and mountaineering adventures, you’ll want to have a few more strings to your bow.
There are loads of rock climbing knots out there and mastering them all takes a lot of practice. If you try to learn them all at once, you will quite literally tie yourself in knots. Here we present seven of the most essential rock climbing knots and hitches used by climbers all over the world.

In fact, if you’re a beginner, our first four – the figure of eight, the stopper knot, the girth hitch and the clove hitch – will suffice until you start to eye up more ambitious objectives. Once you start loading up your hiking backpack for a mountaineering adventure featuring obstacles like glacier travel, you will want to start mastering hitches like the prussik.

It’s a good idea to rehearse tying these rock climbing knots at home before heading out. Better still, find an experienced friend or book an instructor to… show you the ropes. There’s a quick jargon buster at the end of this guide too, just in case you need a bit of revision on your bights and hitches.
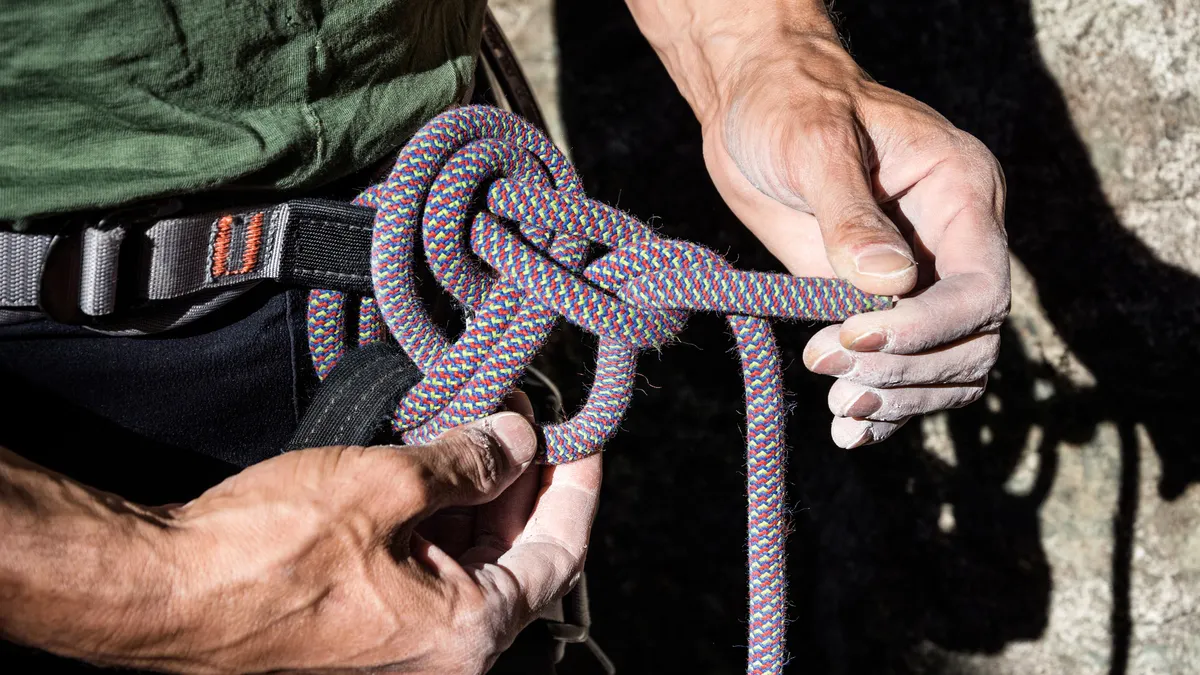
Rock climbing knots: figure of eight

The figure of eight is the standard knot climbers use to attach the rope to their climbing harness. Its advantages are many: it’s relatively easy to tie, it’s secure and it’s obvious when tied incorrectly upon visual inspection. Its disadvantages are that it is difficult to adjust and once loaded can be fiddly to untie. The figure of eight knot can also be used to secure a loop your rope around a fixed anchor, such as a rock spike or a tree.
1) Take the working end of the rope and in your left hand and measure out an arm’s length, taking the rope from your outstretched hand to your opposite shoulder.
2) Make a bight in the rope at your shoulder, hold it with your left hand and twist the rope so that the working end is to the right in your right hand.
3) Loop the working end across and around the back of your left hand, before threading the end through the rope loop and pulling through. You should now have a single figure of eight loop.
4) If you are attaching the rope to your harness, you pass the working end of the rope through your front harness loops, starting with the bottom one and up through the top, until the figure of eight in the rope is close to your harness.
5) Now rethread the working end, following the path of the standing rope through the figure of eight so that each rope is doubled up. Make sure you’ve got several inches of tail at the end of the knot, which can be used to make a stopper knot for extra security (see next knot and video).
6) Before doing any kind of stopper knot, spend time dressing the figure of eight knot, making sure all the strands are neat and running parallel with each other.
Rock climbing knots: stopper knot for a figure of eight
After you have tied a figure of eight knot for your harness, you will usually have several inches of tail, which can be tied off with a simple stopper knot.

1) Loop the tail around your rope once, before doing another loop back towards your figure of eight. If you have a longer tail, you can do multiple loops here.
2) Thread the remaining tail through these loops and pull tight.
Rock climbing knots: girth hitch

A girth hitch is a simple trick for connecting things like slings to carabiners, harness tie-in points or fixed objects. It is straightforward to set up and extremely useful. On multi-pitch routes, it can be handy to have a sling or similar attached to the front of your harness in this way, so that you can quickly make yourself safe when you reach an anchor.
1) Wrap one end of the loop around the object.
2) Take the other end of the loop and feed it through the first loop, pulling everything tight.
Rock climbing knots: clove hitch

A clove hitch is a fast and easy way to secure members of your group to a fixed anchor using their own climbing rope. While not quite as secure as a figure of eight, it is much quicker, so is useful in situations where speed also means safety. It’s also easy to untie.
1) Holding the rope out in front in both hands, form a loop by crossing the rope over itself.
2) Next, form another loop in the same way, so that you’ve got two almost symmetrical loops. The reason it’s almost and not totally symmetrical is that the tail on the first loop is passed under the main rope whereas the tail on the second loop passes over.
3) Move the second loop behind the first and clip the carabiner through them.
Rock climbing knots: bowline
A bowline is a good alternative to a figure of eight when tying the rope around a natural anchor, such as a rock spike or a tree.
1) Wrap the rope around the natural anchor.
2) Make a loop in the standing end of the rope, with the part of the rope leading to the working end on the top.
3) Feed the working end of the rope through the loop so that it is parallel with the standing side.
4) Next bring the working end behind and around the standing side, before feeding it back through the loop.
5) Pull the two strands that come through the loop and the standing side in order to dress it before pulling all the strands tight.
Rock climbing knots: Double fisherman’s knot

The double fisherman’s knot is commonly used to tie two different ropes together and is useful if you want to create a prussik (see next) out of a length of cord.
1) Take the end of two ropes or cords and place them together so that they are parallel but facing the opposite direction.
2) Put one of the ropes in the palm of your hand and close your fist around it, with your thumb over the top of the rope.
3) Bring the working end of the other rope over your thumb, under the first rope and back over the top of your thumb, crossing over itself.
4) Carefully remove your thumb and slide the working end of the rope through the loop you just created, pulling it tight.
5) Now repeat the process, but this time with the working end of the other rope. This should give you two knots, with two strands between them.
6) Pull the ropes on the outside of the knots to bring them together in the middle. You can check everything is as it should be with a visual inspection. On one side of the knot you should have four tight, parallel strands and on the other should be two sets of crossed strands.
Rock climbing knots: prussik hitch

A prussik is a friction hitch that has its uses when rappelling (abseiling) and in glacier rescue situations. Once in place, it can be manually moved up and down a rope length but locks when put under strain. This allows you to a use a prussik to ascend a rope.
1) Take your loop and place it underneath your climbing rope.
2) Take the end with the connecting knot and loop it around the rope three times, in effect creating a kind of girth hitch.
3) Pull the hitch tight and dress it, making sure all the loops are neat and tidy. You can test it by pulling hard on the connecting loop both up and down the rope. If tied correctly, it should grip the rope, allowing no movement.
Rock climbing knots: the jargon
Thought a ‘hitch’ was a film starring Will Smith? Perplexed that your climbing buddies keep asking you to put a bite the rope? Do not fear! There’s not too much jargon to get your head around when it comes to rock climbing knots. We untie the lingo here:
Working end: the working end is the end of the rope that the knot is being tied with
Standing end: the standing end is the end of the rope that is not being used for the knot
Bight: a bight is a section of rope between the two ends
Hitch: a hitch connects the rope to something: it could be a carabiner or to another length of rope

