
Camping can take on a new meaning if you know how to build a shelter with natural resources. When it comes to outdoor adventures, it’s tough to beat a woodland camp. After all, pitching a tent deep in a forest is a great way to fully immerse yourself in the great outdoors.
Then there’s camping with a simple set-up with your best camping tarp – often in conjunction with a hammock – or spending a night in a bivvy bag. All of these can get you even closer to the sights, sounds and scents of nature. But for a truly elemental experience, the purest shelter of all is one built entirely from natural materials.
Knowing how to build a shelter from natural resources such as fallen branches, leaf litter, bracken and whatever else is at hand is also a useful survival skill, and one that could be a potential lifesaver in a genuine emergency. In fact, shelter is often regarded as the most important of the key elements that humans need to stay alive (along with first aid, fire for warmth and water). Without meeting these needs, your chances of surviving in the wild are slim to none. That’s because you can survive for three weeks without food and up to three days without water – but in extreme conditions, as little as three hours without shelter. Exposure or hypothermia can be serious hazards in the great outdoors.

So, knowing that, we bet you’re eager to learn how to build a shelter from natural resources. Here are our top tips.
How to build a shelter: preparation
Location
A shelter guards against the risks of exposure by giving you a physical barrier from the elements, providing protection from wind and rain. Ideally it should also offer some insulation to help keep you warm. The benefits of a natural shelter can be maximized by carefully considering where you build it. When selecting a location, look for a spot that is naturally shielded from wind, and which is unlikely to flood in heavy rain. Ideally, the ground should be relatively level and well-drained. Try to avoid valley floors and other low-lying areas, as cold air tends to settle in these places.

Shelter-building kit
Although a natural shelter can be built with little or no equipment, the task is made much easier if you have some simple tools. A fixed-blade camping knife and a folding saw are particularly handy, as is a few metres of paracord or sturdy garden twine.
The knife and folding saw are used to trim materials to size and gather small pieces of undergrowth, not to hack at living woodland. Unless you have the permission of the landowner, refrain from cutting down green trees and branches. Instead, look for recently fallen deadwood to construct your shelter.
The lean-to shelter
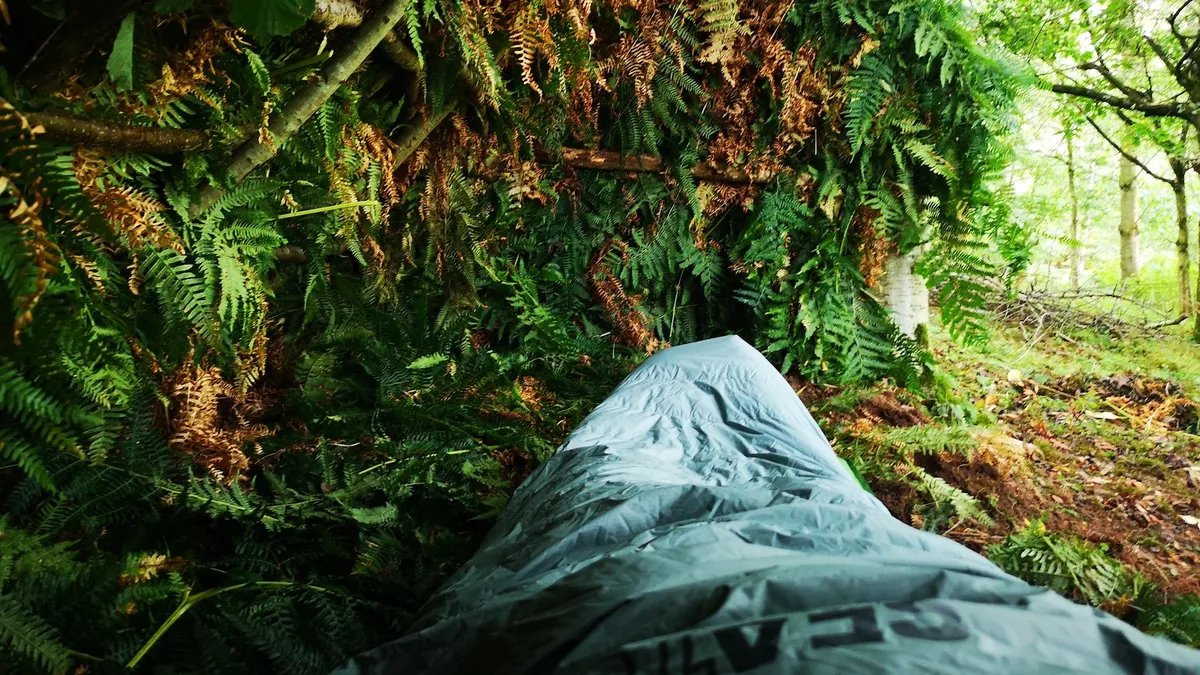
There are many different types of shelter, but a basic lean-to is one of the simplest and easiest natural shelters to build. When properly sited and roofed, it acts as a practical shield from precipitation and wind. If built in conjunction with a reflector-style campfire, it can also offer enough insulation to keep you alive and relatively comfortable. This versatility ensures it is equally effective in warm, temperate or cold climates.
All you’ll need are two suitably spaced trees and access to plenty of natural materials in the form of long, straight branches and leafy roof cover – fern and bracken is ideal, but leaf litter and other debris from the forest floor will also work.
How to build a natural shelter: let’s start building

1. Fixing a ridge pole
Select two sturdy trees, which ideally should be spaced about a body length apart from one another. This will mean that when you build your shelter, it will be roomy enough inside to stretch out fully. If you can, try to find trees with forked branches that can be used to support your ridge pole.
Next, find a long, straight branch to act as your ridge pole. It is vital that this ridge pole is relatively strong, since it will bear most of the weight of your shelter, so look for a piece of wood around three inches in diameter, or roughly the thickness of your wrist.

Place each end of the wood between the forked branches of your trees to form a horizontal ridge pole. Jam it in securely. If your trees lack handy forks, you can use cordage to lash your ridge pole to the trunks.
Think about how much headroom you want in your shelter when securing the ridge pole. This might be dictated by the position of the forks, but generally you at least want to be able to sit upright, and in some cases kneel or even stand. On the other hand, bear in mind that a lower shelter provides more protection from the elements, which may be a consideration in very cold, wet or windy climates.

2. Creating a lean-to
Place staves against the ridge pole, spacing them equally along its length. Your staves should all be long enough to reach diagonally from the ridge pole to the ground, creating the skeletal frame of a simple lean-to. These staves do not need to be as thick or as strong as your ridge pole – generally, branches about an inch in diameter (a little thicker than your thumb) are sufficient.
Dig the ends of the staves into the ground to form a neat row. At this point, ensure there is enough room to lie out beneath the lean-to structure, so that you will be protected from the elements when inside the finished shelter.

3. Lashing horizontal spars
Use flexible branches – willow, birch or hazel are ideal – to create horizontal spars for your lean-to shelter, weaving them alternately under and over each of the vertical staves. You may need to lash them to the end staves. Paracord is great for this, as is strong twine. Of course, in a survival situation, you could tear strips of fabric for cordage. Similarly, bushcrafters often make natural cordage from a range of materials, which might include everything from grasses and nettles to the inner bark of trees (bast) or even withies (the thin, pliable stems of saplings, particularly species such as hazel, willow, birch, elm, poplar and ash).

Ideally, use a square or Japanese lashing to fix your spars. A square lashing starts with a clove hitch and takes a series of wraps around the spars, before frapping around the line running between the spars. A Japanese lashing is used similarly, but is faster and easier to tie, since both ends of the rope or cordage can be used as working ends. And as the old saying goes, “If you can’t tie knots, tie lots!” – so don’t worry if you’re unfamiliar with lashings. The main aim is simply to ensure each horizontal spar is securely fastened to the staves to form a rigid lean-to frame.

4. Completing the lean-to frame
Now take a series of thinner branches and weave them between the staves to complete the lean-to frame. Ideally, these additional branches should be as long as your horizontal spars, but if they are shorter, no matter – simply place them wherever you see a gap in the frame. The aim is to create a closely-knit structure that will support a roof of leaves and bracken.

It doesn’t matter if these thinner branches have offshoots of twigs or leaves – in fact, these can be employed as additional roof cover for your lean-to. Weave them into the upper section of the shelter, alongside the ridge pole, where they will offer additional support for your top layers of leafy material and bracken.

5. Locking off the ridge pole
With the basic frame of your lean-to shelter complete, you can now use a secondary branch to ‘lock off’ your ridge pole. This prevents the shelter from moving or collapsing in high winds. Take a long, sturdy branch and jam it between the forks of the two trees, placing it lengthways alongside your ridge pole and over the top of your vertical staves. This should effectively hold the structure together and lock everything in place.

6. Roofing your shelter
Beginning from the ground up, layer bunches of bracken along the length of the lean-to, working from the outside of the shelter. Position the bracken with the stems pointing upwards and fronds downwards, which will help to ensure good rain run-off. You can weave the stems into the frame to ensure the bracken stays in place. If you don’t have access to bracken, you can use leafy twigs and branches, and then pile leaf litter and other debris on top.

Work your way gradually upwards towards the ridge pole, creating overlapping layers of cover. You will need plenty of material to make your shelter weatherproof and to provide adequate insulation – aim for a thickness of about 6 inches to fend off wind and rain. Periodically check for any gaps by ducking inside the shelter and looking through the roof.

7. Building side walls
The roof of the lean-to shelter is now complete. However, to make it more comfortable by providing a little added insulation as well as wind protection, you can also build walls for your lean-to, using a similar method as employed for the roof. Create a lattice of staves and spars between the angled roof of the shelter and the vertical tree trunks, using lashings if necessary. Then weave in more layers of bracken to form a wind-blocking wall. This can be done either on one or both sides of the shelter, depending on the prevailing wind direction.

8. Constructing a sleeping platform
The final step is to create a sleeping platform before laying out your sleep system. Remove any twigs, stones and other debris to create a level, flat area of ground inside the shelter. Fill this space with a thick covering of soft, dry debris such as leaves or bracken. This will provide vital insulation that will prevent the ground from drawing heat away from the body. That’s it – job done. This simple lean-to will provide you with basic protection from the elements. When combined with a campfire, which you can build just outside the sleeping area, you ought to stay alive and relatively warm throughout the night in your shelter built from natural resources.


